The Six Degrees Of Activity Lifecycles
As an Android developer, one of the most fundamental concepts that you’ll learn about is Activities. Activities are a Java class that focus on a single thing that users can do. Many involve user interactions, and in most apps on your phone you can think of each page of the app as an activity. Open Gmail and see your list of recent messages? Activity. Click on one of those messages to open it in a new page? Activity.
Activities are everywhere in Android development, yet many developers that are just starting out don’t fully understand how they function. You might be able to get by without a full understanding, but this can be lethal to your app as it expands and becomes more complicated. Lack of understanding opens up Pandora’s box for things to go wrong with memory leaks and debugging errors down the road.
Diving In:
So let’s take a blog post to discuss the Activity Lifecycle in a little detail. We won’t get stuck in the weeds, but cover the basics enough that you understand what’s going on under the hood and can prep for smooth app development.
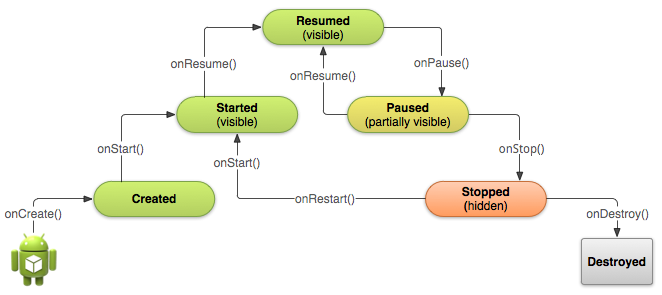
Just like humans have a lifecycle from birth to death, apps have a lifecycle they follow from when their first launched to when the user closes them. There are six methods that can be called to change the state of an activity in Android: onCreate(), onStart(), onResume(), onPause(), onStop(), and onDestroy(). At first glance these may seem similar if not identical to one another, but understanding the differences is key to a successful user experience.
onCreate():
This is the first of the 6 lifecycle methods called in an activity, and its invoked when (you guessed it) the activity is created. In this method startup logic that should only happen once during an activity’s life takes place. Examples of this might be to bind data to a list, or to instantiate class-scope variables. The bottom line is that this is called once and only once.
onStart():
Immediately after onCreate() comes onStart(). The start state of an activity occurs when it is made visible to the user. This is where logic goes to prep the activity to enter the foreground and become interactive. In other words the User Interface (UI) is taken care of here.
onResume():
Yes I know, it’s three different methods whose names make it sound like they all do the same thing. Here’s the key difference with onResume() though. onResume is called when an app has already been created and comes into (or back into) the foreground. An activity is constantly interactive as long as it’s in the foreground for the user.
But what if your app includes a pop up message over the activity? Well now that pop up has the foreground. Your activity from before will enter the onPause() state (keep reading!) until that pop up goes away. Once it does your app will resume, and thus the onResume() method will be called again. For example, let’s say your playing a game and an alert interrupts it. Obviously we don’t want the game to keep going when the user can’t see it, because that would be incredibly frustrating when the user returns and finds out they died while they were way. So we call onPause() when an activity loses focus and certain resources need to either be cleared or put on hold.
onPause():
There’s really not too much more to this one other than what I said before. It tags in and out with onResume() to create/delete resources when needed depending on if a user has focus. It’s where the magic happens if you do things right, and where things go noticeably wrong if you don’t.
onStop():
When your activity is no longer visible, it has stopped. This is different from onPause() in that your activity is entirely shrouded. Instead of a pop-up that might cover half of the screen, a new activity may have taken place and covered your current one completely. This is essentially where the app has can completely remove unused resources that the user won’t need when returning to the activity again.
onDestroy():
And finally comes our 6th method that wraps everything up. This is called right before an Activity is destroyed, and as such you want nothing left hanging around. If you forget to close up a loose end in onDestroy(), your app may begin to suffer from memory leaks and eventually bog things down. Bottom line is that all resources should be released here if they weren’t in onStop().
These 6 methods essentially bounce the user between the two states of in the user’s foreground and in their background, but there are intricacies that go a lot deeper between them. As such properly knowing when to implement each of them can be a life saver for your apps, and a huge time saver for you when you’re building things out and want to know what’s going wrong.
If you felt lost at all along the way of this blog, then you should check out Phonlab’s Android App Developer Course! It’s a great way to go from writing your very first line of code up to publishing our own apps on the Play Store.


Super Fans always leave a comment :-)